Web services
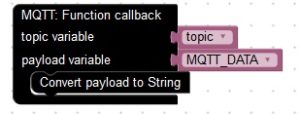
- MQTT Loop:
Allows to the client to process the incoming data. You should put it in the mail loop.>
Video: Basic MQTT operations
- MQTT Publish:
Send a message to the broker under the provided topic. The sent message in provided into a variable.
Video: Basic MQTT operations
- Webservice IFTTT:
This bloc will send a http request to the web service IFTTT. You need to specify the key, the event name and values. The values could be empty. With the IFTTT service, you can send an email, an SMS, Tweet, publish status on Facebook … You need to create an applet with the Webhooks service. Follow one of these tutorials for more information.
Video tutorial: Post status on Facebook.
Video tutorial: Send an email with GMAIL.
Video tutorial: Send an SMS
- ADAFRUIT MQTT SETUP:
This bloc should be called only once (in the setup part) if you want to communicate the board with the ADAFRUIT IO MQTT server. You need to specify the user name and the key. To have these information, you need to create an account. Keep the default port. For more example, watch one of these videos:
Video tutorial: Send information to the ADAFRUIT IO Server
Video tutorial: Get information from the ADAFRUIT IO Server
- ADAFRUIT MQTT Publish:
This bloc will allow you to publish any data to the specified feed. The bloc returns true if the date was sent successfully, otherwise, it will be false.
Return type: Boolean.
Video tutorial: Send information to the ADAFRUIT IO Server
- ADAFRUIT MQTT Is connected:
Return true is it is connected to the io.adafruit.com site. Otherwise, it will be false
Return type: Boolean.
Video tutorial: Send information to the ADAFRUIT IO Server.
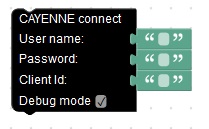
- Cayenne Connect:
Connects to the Cayenne IOT platform. You need to have an account on the platform. To connect to the server, you need to give the username, the password and the client ID that you will find on your account.
If the debug mode check box is checked, you will see debugging information on the serial monitor (connection state, a received message …) You should call this block only once in the setup when you want to connect to the Cayenne platform.

Video: Send data to Cayenne platform
- Geolocation:
Make a request to the Google Geolocation service to get the position of the board. You need to create an account and a Key will be given. Once you called this block, you can use the location block.

Video: Geolocation


 I am Adel Kassah, a computer science teacher in middle school from Tunisia. Now, I am working in the UAE (ABU DHABI) I try to promote coding culture in my country and around the world. I run after school club about programming to kids. I teach them how to make their own games, their own Android App. They learn how to program embedded system and Robotics. I also cooperate with association around Tunisia and share my expertise. I develop my own tool or improve existing one. I made several presentation in conferences about Technology and coding. Lately I was interested about the world of Internet of Things. I made a tool TUNIOT that makes easy programming the NODEMCU board.
My blog is a place where I share my experience to the world.
Welcome everyone! I am happy to see visitors from around the world, from places where I've been and from others I would love to visit. It is always a pleasure to see the map of visitor.
Don't hesitate to contact me for a cooperation.
adelkassah@gmail.com


